The best floor insulation for your property depends on one thing above all others: the type of floor you have. Get that wrong and you either specify the wrong material, choose the wrong installation method, or spend money on a system that cannot perform as intended. This guide walks through the options clearly so you can make the right choice for your specific property in 2026.
The Two Main Floor Types in Older UK Properties
Suspended Timber Floors
Suspended timber floors are found in most properties built before 1930. The floor sits on joists spanning across a void between the floor structure and the ground below. The void is ventilated by airbricks in the external walls to prevent moisture from building up in the timber.
This construction is effective at managing moisture but very poor at retaining heat. Cold air circulates in the void beneath the floor and the uninsulated boards above lose heat continuously. An uninsulated suspended timber floor can account for up to 15% of a home’s total heat loss.
Solid Concrete Floors
Solid concrete floors are found in many post-war properties built from the 1940s onwards, and in most modern builds. The floor sits directly on the ground with no void beneath it. Without insulation, the concrete slab conducts cold upward from the ground year-round.
Solid floors require a different insulation approach because there is no void to work with. Insulation must be added either on top of the existing slab or beneath a new screed.
The Best Floor Insulation for Suspended Timber Floors
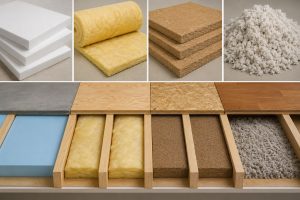
Mineral Wool Batts Between Joists
For suspended timber floors where the void beneath is accessible from below, mineral wool batts fitted between the joists are the most widely recommended solution. The batts are cut to fit the joist spacing and supported by netting, breathable membrane, or purpose-made clips stapled to the underside of the joists.
Mineral wool is breathable, which is important in a suspended floor void where ventilation must be maintained to protect the timber. It performs well thermally and is cost-effective. The main condition for suitability is that the void must be in good condition with adequate ventilation and no existing moisture problems.
This is the best floor insulation method for accessible suspended timber floors in most older properties. It causes no disruption to the room above and is typically complete within a day for a standard ground floor.
Rigid PIR Boards Between Joists From Above
Where the void beneath the floor is not accessible, floorboards are lifted and rigid PIR boards are fitted between the joists from above. PIR delivers higher thermal performance per millimetre of thickness than mineral wool, which matters where joist depth is limited.
This method is more disruptive than installation from below because the floorboards must be lifted and relaid. However it delivers excellent thermal performance and is the right choice where crawl space access is not available.
The Best Floor Insulation for Solid Concrete Floors
Rigid PIR or XPS Boards on Top of the Slab
For solid concrete floors, rigid insulation boards laid on top of the existing slab before a new floor finish is applied are the standard solution. PIR boards offer the highest thermal performance for a given thickness. XPS boards offer slightly lower performance but higher moisture resistance, making them well suited to ground-floor applications where rising damp could be a concern.
Both materials are durable, stable, and compatible with most finished floor types including engineered timber, laminate, and tile. The boards are typically 50mm to 100mm thick depending on the target U-value and the available floor-to-ceiling height.
This approach raises the floor level, which requires door frames, skirting boards, and any thresholds to be adjusted. A competent installer will calculate the finished floor height at the survey stage and advise on what adjustments are needed.
What About Spray Foam?
Spray foam is sometimes marketed as the best floor insulation for suspended timber floors because of its speed of application. It is sprayed from below and expands to fill the spaces between joists.
However, spray foam has caused serious problems in the UK mortgage market. Several lenders now decline applications on properties where spray foam has been applied to the floor or roof structure because it makes timber inspection difficult and removal is costly. If you plan to sell or remortgage in the foreseeable future, spray foam is not recommended regardless of its thermal performance.
How Floor Insulation Affects Your EPC Rating
Floor insulation is a recognised measure in the EPC calculation. Insulating a previously uninsulated suspended timber floor contributes to an improved rating. The scale of improvement depends on the floor area and the overall performance of the rest of the building, but floor insulation is a valued measure that registers clearly on the certificate.
For landlords approaching the proposed 2030 minimum EPC standard of C for new tenancies, floor insulation is a useful complementary measure alongside wall insulation. For more on EPC certificates and ratings, visit epccertificates.co.uk.
Is Grant Funding Available?
Floor insulation is an eligible measure under ECO4 for qualifying households. If your property has an EPC rating of D or below and your household receives a qualifying benefit, you may be eligible for funded installation. Check your eligibility at gov.uk . The Energy Saving Trust provides further guidance at energysavingtrust.org.uk.
Combining Floor and Wall Insulation
The most impactful approach for older UK properties is to treat both the floors and the walls. For cavity wall and solid wall insulation options, visit wallinsulation.co.uk. For external wall insulation on solid wall properties, visit ecoinsulation.co.uk .
Combining projects in the same season reduces total disruption and in some cases allows cost efficiencies where survey visits and access work overlap.
If you want to find out which is the best floor insulation for your older UK property in 2026, contact us today. We survey your floor construction, confirm the right material and method for your specific situation, and check your eligibility for any available grant funding before any work begins.