We use cookies to provide you with a better experience. By continuing to use this site, you agree to our use of cookies.

Solid Floor Insulation for Underfloor Heating Retrofits: What You Need to Know (2026)

Retrofitting underfloor heating into a solid concrete floor is one of the more involved home improvement projects available. Solid floor insulation for underfloor is the element that most determines whether the system works efficiently or wastes most of its output heating the slab beneath it. Get the insulation right and the UFH performs quickly and cost effectively. Get it wrong and you have a heating system that is slow to respond, expensive to run, and unable to reach the temperatures you need.


This guide covers the specific insulation requirements for UFH retrofits into existing solid concrete floors , the decisions that matter, the mistakes to avoid, and the sequence that produces a working system.


Why Solid Floor Insulation for Underfloor Is Non Negotiable Under Retrofit UFH

A solid concrete floor is a significant thermal mass. It absorbs heat readily. Without insulation beneath the heating element, a meaningful proportion of the heat the system generates travels downward into the slab and from there into the ground beneath, rather than upward into the room.


The consequences are practical and financial:


Slow warm up times. The slab needs to heat up before the room above feels any benefit. Without insulation, the slab never fully warms because heat is constantly escaping downward. The system runs for extended periods without the room reaching target temperature.


High running costs. Heat escaping into the ground is wasted energy. A UFH system installed without adequate insulation routinely costs significantly more to run than the same system with correct insulation, because it needs to work harder and longer to maintain comfort.


Reduced flow temperature compatibility. Modern heat pumps operate most efficiently at low flow temperatures , typically 35 to 45°C. UFH is well suited to these temperatures because of its large surface area, but only if the insulation below the heating element is sufficient to prevent downward heat loss. Without adequate insulation, the system needs higher flow temperatures to compensate, which undermines heat pump efficiency.


The Part L Building Regulations require that where UFH installs in a new or substantially altered floor, the floor construction achieves a U value of 0.25 W/m²K or better. This is not achievable without meaningful insulation beneath the heating element.


The Insulation Options for Solid Floor UFH Retrofits

Under Screed Insulation (Full Strip)

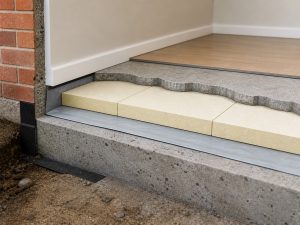
The most thermally effective approach. The existing floor finish and screed strip back to expose the concrete slab. Rigid insulation boards , typically PIR at 75 to 100mm thickness , lay on the slab surface. The UFH pipes or mats install on top of the insulation. A new screed goes over the pipes and insulation, finishing at or near the original floor level.


The thermal performance of this system is excellent. With 100mm PIR beneath the screed, the floor achieves a U value well below 0.25 W/m²K. The UFH responds quickly because the insulation prevents heat from escaping downward and directs it upward into the screed and the room.


The downside is disruption. Stripping the existing floor finish and screed involves a full room clearance, significant dust and debris, and a substantial programme of works. The floor level typically rises slightly if the new screed is thicker than the original, which can require adjusting door thresholds, skirting boards, and transitions to adjacent rooms.

Overlay System (No Strip)

Where stripping the existing floor is not practical , the existing screed is in good condition and the floor level must not rise significantly , an overlay system installs directly on top of the existing floor.


A thin insulation panel , typically 15 to 30mm of PIR , lays on the existing surface. A low profile UFH mat or a very thin screed over UFH pipes installs on top. The total floor build up is kept as thin as possible to minimise the floor level rise.


The thermal performance of this approach is lower than under screed insulation. At 20mm PIR, the insulation resistance is limited. The system compensates by using higher flow temperatures or running for longer periods. This is acceptable with a gas boiler but less compatible with a heat pump operating at low flow temperatures.


Overlay systems work best in situations where the primary driver is comfort enhancement rather than maximum energy efficiency, or where a heat pump is not in the plan.

Insulated Screed Panels

A hybrid approach using panels that combine insulation and a channel or groove for the UFH pipes in a single product. These install directly on the slab or on a thin base layer of insulation. The panels position the pipes at a consistent depth and spacing, which simplifies installation.


Insulated screed panels typically offer 25 to 50mm of insulation integrated into the panel. Where the slab is on solid ground with good thermal mass, this level of insulation can be adequate. On ground floors over poorly drained or cold ground, additional insulation below the panel is recommended.


The Sequence That Works

A correctly sequenced solid floor UFH retrofit follows these steps:


  1. Damp survey before anything else. Solid concrete floors can harbour rising damp, particularly in older properties where the damp proof membrane has failed or was never present. Installing insulation and a heated floor over rising damp traps moisture in the construction and causes problems within a few years. Any damp issues need diagnosing and treating before insulation goes in.


  1. Assess the existing floor level. Measure the existing floor height relative to door thresholds, adjacent room levels, and fixed elements such as kitchen units. Determine the maximum additional floor depth that can be accommodated without requiring major adjustments.


  1. Choose the insulation and UFH system. The insulation thickness and system type follow from the floor level assessment and the heating system. For heat pump compatibility, maximise insulation thickness within the available depth. For a gas boiler system where heat pump integration is not planned, a thinner overlay system may be acceptable.


  1. Prepare the existing floor. For under screed systems, strip to the slab. Clean and level the slab surface. Fill any cracks or voids. For overlay systems, the existing screed needs to be sound , any loose, hollow, or cracked areas need repair before overlaying.


  1. Install a damp proof membrane if not already present. A heavy duty polyethylene membrane on the slab surface provides a moisture barrier before the insulation goes on. For under screed systems, this also acts as a slip membrane between the slab and the insulation.


  1. Lay insulation boards. Boards butt tightly together with taped joints to prevent screed from leaking into the insulation layer during pouring. Boards turn up at the perimeter of the room to create an edge insulation layer that prevents heat from escaping into the surrounding walls.


  1. Install UFH pipes or mats. Pipes fix to the insulation surface using staples, clips, or a pre grooved panel. Flow and return connections route to the manifold location.


  1. Pressure test the system. The UFH circuit pressurises before screed goes on. Any leaks are fixed before the pipes are buried.


  1. Pour screed. Liquid screed (anhydrite) or sand and cement screed goes over the pipes. Liquid screed flows around pipes easily and reduces air pockets. It typically takes 24 to 48 hours to be walkable and four to six weeks to cure fully before the system can be commissioned.


  1. Commission the system. The UFH commissions gradually , starting at low temperatures and increasing over the first few weeks to dry the screed without cracking it.


Specific Considerations for 1960s and 1970s Concrete Floors

Properties built in the post war decades frequently have concrete ground floors with limited or no insulation. The concrete is often directly on a hardcore base with a thin screed on top. The damp proof membrane, if present, may be a bitumen coating on the slab rather than a modern polyethylene sheet.


These floors benefit significantly from UFH with good insulation below. But they often have characteristics that need addressing first:


Thin or cracked screed. Post war screeds were often laid relatively thin and have cracked over decades. Overlaying directly on a cracked screed transfers the cracks upward. A thin self levelling compound over the existing screed fills cracks and provides a flat surface for the insulation.


Poor or absent damp proofing. A new damp proof membrane at slab level is a standard specification item for retrofitting insulation and UFH into this generation of properties.


Lower floor to ceiling heights. Post war properties built to economy standards sometimes have lower floor to ceiling heights than older or newer properties. Any floor level rise from the UFH and insulation build up is more noticeable in a property where ceiling height is already limited.


Frequently Asked Questions about Solid Floor Insulation for Underfloor

How much does solid floor insulation and UFH retrofit cost? For a full strip and re screed with UFH on a typical 50m² ground floor, expect £4,000 to £8,000 for the insulation and screed element, plus £2,000 to £4,000 for the UFH pipe, manifold, and associated controls. Total costs vary significantly with floor area, access, and finish specification.


Can I install UFH without insulation below? Technically yes, but it is strongly inadvisable and in new construction it would not comply with Building Regulations. Without insulation, the system’s running costs increase substantially and its compatibility with low temperature heating such as heat pumps is compromised.


How long does it take to retrofit UFH with insulation into a solid floor? The stripping, insulation, and screed work typically takes three to five days for a typical ground floor room. The screed then needs four to six weeks to cure before commissioning. The total programme from start to operational system is typically six to eight weeks.


Does the floor level always rise with a solid floor UFH retrofit? With a full strip, the new build up can often match the original level if the existing screed is removed and the new screed is specified at the same depth. With an overlay system, some level rise is unavoidable. The extent depends on the insulation and screed thickness chosen.
 

Solid floor insulation for underfloor Costs and technical specifications correct as of April 2026. Always commission a damp survey before installing insulation or UFH on a solid concrete ground floor.
 

Suspended Floor Insulation: A Complete Guide for UK Homes (2026)

A timber ground floor is one of the easiest parts of an older home to insulate with simple suspended floor insulation, and one of the most overlooked. If your house was built before the 1930s, you almost certainly have a suspended timber floor sitting above a ventilated void, and cold air circulating beneath those boards is responsible for a significant portion of the draughts and heat loss that make your ground floor uncomfortable in winter. This guide covers everything you need to know about insulating it properly.


What Is a Suspended Timber Floor?

A suspended timber floor consists of floorboards nailed to joists, which span between sleeper walls built off the ground. The joists sit above a void, typically 150 to 300mm deep, which ventilates through airbricks in the external walls. That ventilation is essential: it keeps the joists dry and prevents the rot that would otherwise result from moisture accumulating in an enclosed subfloor space.


This construction was standard in UK housebuilding from the Victorian era through to the 1930s and 1940s, when solid concrete ground floors began to take over. Most pre-war terraces, semis, and detached houses in the UK have suspended timber ground floors, which means tens of millions of homes have this cold, draughty detail directly beneath their feet.


The void beneath the floor connects to outside air through the airbricks. In winter, that outside air is cold. Without insulation between the joists, very little separates the warm room above from the cold air below.


Why Suspended Floor Insulation Makes Such a Difference

The thermal performance of an uninsulated suspended timber floor is poor, a U-value of around 0.7 to 1.0 W/m²K is typical. Adding 100mm of rigid insulation between the joists brings that down to approximately 0.18 to 0.25 W/m²K, a fourfold to fivefold improvement.


But the bigger impact for most people is draught elimination. The gaps between floorboards and around the perimeter of a room allow cold air to flow up from the void directly into the living space. This draughting effect makes rooms feel significantly colder than the air temperature alone would suggest. Suspended floor insulation and sealing the gaps eliminates this entirely.


Homeowners who have insulated their suspended floors consistently report that the floor itself feels dramatically warmer underfoot, that the room heats up faster, and that the heating system does not need to work as hard to maintain temperature.


Suspended Floor insulation Access: From Above or Below?

The first practical question is how to get the insulation between the joists. There are two routes.

From Below (Preferred)

If your property has an accessible subfloor void, at least 400mm of clearance between the ground and the underside of the joists, a contractor or determined DIYer can work from underneath, fitting insulation up between the joists without disturbing the floor above.


This is the preferred approach because it causes no disruption to the room above, avoids the cost of lifting and relaying floors, and allows the whole ground floor to be done in a single operation.


Access happens through an existing airbrick opening enlarged temporarily, or through an access hatch cut in the floor. Most subfloor voids have enough room to work in, though it is confined, dusty, and physically demanding. Professional contractors work in teams to move through the void efficiently.

From Above (Lifting Boards)

Where the subfloor void is too shallow for access, or where the floor is getting lifted for another reason, such as new pipework or a damp proof membrane, insulation fits from above with the boards removed.


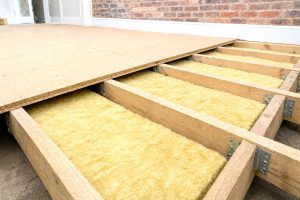
Boards lift carefully, insulation cuts and fits between the joists, and the boards go back down. This approach gives clean access and allows the installer to inspect joist condition at the same time, but it costs more and creates more disruption.


Suspended Floor Insulation Materials

Several materials suit suspended floor insulation, each with different performance and cost profiles.

Rigid PIR (Polyisocyanurate) Boards

The highest performing option by thermal resistance per unit thickness. A 100mm PIR board achieves a thermal conductivity (lambda value) of around 0.022 W/mK, delivering excellent U-values without needing to fill the full joist depth.


PIR boards cut cleanly with a handsaw or utility knife and fit snugly between joists when sized correctly. They need mechanical support, either a netting system stapled to the joist sides, purpose-made clips, or thin battens nailed across the joist undersides, to prevent them falling into the void.

Rigid EPS (Expanded Polystyrene) Boards

A lower-cost alternative to PIR with a slightly higher lambda value (around 0.038 W/mK), meaning you need more thickness for the same performance. EPS is lighter and easier to handle in a confined void, and cuts equally easily. It is the most common choice for DIY installations.

Mineral Wool Batts

Flexible mineral wool cut to fit between joists. Easier to fit around obstructions such as pipes and noggins than rigid boards, and cheaper. Mineral wool has a higher lambda value than PIR (around 0.035 to 0.044 W/mK) and is less moisture-resistant. It needs careful installation to avoid gaps at the edges, and requires netting or battens for support.

Blown Insulation

Where access from above or below is difficult, loose insulation, typically mineral wool or cellulose fibre, can be blown into the void through holes drilled in the floorboards. This suits situations where the floor cannot be lifted and the void is inaccessible.


Blown insulation fills the void rather than just the joist depth, but it does not maintain the ventilation gap beneath the insulation in the same controlled way as fitted boards. It requires a specialist contractor with the right equipment.


Vapour Control

Moisture management matters in a suspended timber floor. The joists and the underside of the floor are susceptible to condensation if warm, moist air from the room above reaches the cold surface of the insulation or the void.


A vapour control layer (VCL) on the warm side of the insulation, between the insulation and the floorboards, limits the amount of moisture-laden air that can migrate downward. In most installations, a polythene membrane or foil-faced PIR board provides sufficient vapour control.


The VCL must not block the subfloor ventilation. The void below the insulation still needs to breathe through the airbricks. Blocking or reducing airbrick ventilation to reduce draughts defeats the purpose: a poorly ventilated void creates the damp conditions that rot joists.


Maintaining Subfloor Ventilation

This is the most important rule of suspended floor insulation: never block the airbricks.


Airbricks ventilate the subfloor void and keep the timber joists dry. They exist specifically because enclosed voids in contact with the ground accumulate moisture. Blocking them, even partially, with insulation material that has fallen into the void, can cause joist rot within a few years.


Before installing suspended floor insulation, check that all airbricks are clear and unobstructed. After installation, verify that the void still ventilates freely. If existing airbricks are damaged or partially blocked with debris, clear them before proceeding.


In some older properties, the number of airbricks is insufficient for the void area. If a survey identifies this, additional airbricks may need installing before insulation goes in.


Dealing with Pipes and Obstructions

Subfloor voids in older properties often contain pipes, water supply pipes, overflow pipes, and sometimes heating pipework. These complicate the insulation job in two ways.


First, they interrupt the insulation run and require careful cutting around to avoid gaps. Second, suspended floor insulation can change the thermal environment around pipes: pipes that previously sat in a relatively sheltered void now sit on the cold side of the insulation, which increases the risk of freezing in very cold weather.


Where supply pipes run through the subfloor void, wrap them with foam pipe lagging before the floor insulation goes in. This protects the pipes from freezing and does not significantly affect the overall thermal performance of the floor.


Step-by-Step: What a Professional Installation Looks Like

For a typical access-from-below installation on a two or three-bedroom terraced or semi-detached house:


  1. The contractor surveys the void via an existing airbrick or access hatch, checking joist condition, void depth, pipe locations, and the state of existing airbricks
  2. An access point into the void is established, either an enlarged airbrick opening or a temporary hatch cut in the floor
  3. The contractor works through the void in sections, fitting insulation boards between each pair of joists from end to end
  4. Boards clip or net into position so they cannot fall. Edge gaps receive off-cuts to maintain a complete thermal barrier
  5. Pipes get lagged as the work progresses
  6. Airbricks are checked and cleared on completion
  7. The access point is made good


A typical two-bedroom terrace takes one to two days from below. A larger property or one requiring boards to be lifted takes longer.


Costs and Savings

Installation costs in 2026

Property type From below (accessible void) From above (boards lifted)
Two-bedroom terrace / semi £600 to £1,200 £1,200 to £2,000
Three-bedroom semi / terrace £900 to £1,600 £1,500 to £2,800
Larger detached £1,200 to £2,500 £2,000 to £4,000


DIY from below, where the void is accessible and the homeowner is comfortable working in confined spaces, costs significantly less, mainly materials, which run to £300 to £600 for a typical terrace.

Energy savings

The Energy Saving Trust estimates annual savings of £60 to £160 for a typical semi-detached property with an insulated suspended floor, based on 2026 energy prices. The comfort improvement, warmer floors, fewer draughts, faster room warm-up times, is often as valuable to homeowners as the bill saving.


Grants and Funding

Suspended floor insulation qualifies as an eligible measure under ECO4 and in some cases the Great British Insulation Scheme, particularly where it forms part of a broader package of improvements.


Standalone floor insulation funding is less common than wall or loft insulation funding, the schemes prioritise higher-impact measures first. However, where a property already has loft and wall insulation and floor insulation is the remaining gap, it may qualify as a primary or secondary measure.


Contact a TrustMark-registered, PAS 2030-certified installer to check current eligibility for your property.


Frequently Asked Questions

Can I insulate my suspended floor myself?

Yes, if the void is accessible and at least 400mm deep. The main requirements are: safe access, correctly sized insulation to fit snugly between joists with no edge gaps, support to hold the insulation in place, and clear airbricks throughout. Many homeowners tackle this successfully as a weekend project. If access is tight or you are not comfortable in confined spaces, use a professional.


Will suspended floor insulation make it feel springy or different underfoot?

No. The insulation sits below the existing boards and does not change how the floor feels or performs structurally.


How do I know if I have suspended floor insulation or if it is solid?

Knock on the floor, a hollow sound suggests a suspended floor with a void beneath. Check whether airbricks are visible in the lower external walls, which confirms a subfloor void. If the floor is at or slightly above ground level with no visible airbricks, it may be solid concrete.


Does the whole ground floor need doing or can I do one room?

You can insulate one room at a time, but insulating the whole ground floor in one operation is more cost-effective and delivers better results. Gaps between insulated and uninsulated areas create cold spots and thermal bridges.


What if my joists show signs of rot?

Stop and get a structural survey before proceeding with insulation. Insulating over rotten joists masks a problem that will only worsen. Joist repairs or replacement come first, then insulation.

suspended floor insulation

Ask Us A Question!